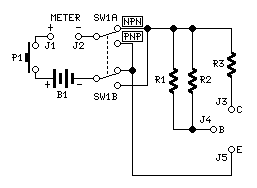
Circuit diagram:
Parts:
R1_______________1M  1/4W Resistor
R2______________10M  1/4W Resistor
R3______________47R  1/4W Resistor

P1_____________SPST  Pushbutton Switch
SW1____________DPDT  Toggle or Slide Switch

J1,J2___________4mm  Output sockets

J3,J4,J5_______1, 2 or 4mm. chassis sockets - or transistor socket
                      or leads ended with crocodile clips

B1______9V PP3 Battery

Clip for PP3 Battery
Comments:
The electronics amateur could be interested to an useful, very easy and cheap way to measure the hfe parameter (also called Beta or simply Gain) of a transistor.
The actual meaning of this parameter is: "the small signal current gain, for a transistor connected in the common Emitter configuration".
This kind of data is particularly useful when selecting the most suitable transistor to be employed in circuits requiring high gain devices like oscillators or audio preamplifiers and amplifiers. Or when two transistor wired in a particular configuration like the long-tailed pair (frequently used in the input stage of audio amplifiers) need to have their gain matched.
Circuit operation:
A Multimeter set to 3, 5 or 10mA fsd, measures the Collector current of the transistor under test when the Base is fed by a 10�A current, set by R1 and R2 wired in parallel. The hfe value is read on the multimeter by multiplying the resulting mA value x100. For example, if the Multimeter display reads 1.5mA, the hfe of the transistor under test is 150.
Connect the Multimeter probes to J1 and J2 respecting polarities, set SW1 in the appropriate position depending on transistor type (NPN or PNP), then push P1 and read the hfe value on the Multimeter display.
Note:
- The circuit can be further simplified by omitting P1 and wiring the positive of the battery directly to J1. In this case the test will start after inserting the Multimeter probes into J1 and J2.


0 comments:
Post a Comment