A bread board is also known as a project board, It has got itself a place in every electronics hobbyist because of its "User Friendly" Nature, a bread board needs no soldering and already it is connected internally, lets see about it in detail.
This is how a bread board looks
A bread board is available in many shapes and sizes and has a facility to connect many boards as you like.
Connections in a Bread Board
NOTE: In some bread boards the top and bottom are not fully linked only 5 pins are linked.
Working
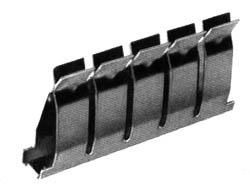
The heart of the solder-less breadboard is a small metal clip that looks like this:
The clip is made of nickel silver material which is reasonably conductive, reasonably springy, and reasonably corrosion resistant. Because each of the pairs of fingers is independent we can insert the end of a wire between any pair without reducing the tension in any of the other fingers. Hence each pair can hold a wire with maximum tension.
Using a Bread Board
Example Connection
This shows how a 380 ohm resistor and an LED are setup on a breadboard. When a 9 volt battery is attached the LED lights. Try replacing the resistor with a higher value such as a 680 ohm resistor. The resistance will be greater and the LED should shine less bright.
all about electronic device
Popular Posts
-
The critical part of the fm radio receiver is the first stage, TR1/VC1, where the wirings must be kept as short as possible. Coil L1 is form...
-
WorldWide Tech & Science. Francisco De Jes�s. Austrian Felix Baumgartner jumps from a balloon 24 miles above Earth. Video. Austrian da...
-
WorldWide Tech & Science. Francisco De Jes�s. NETGEAR Executives Discuss Future of Connectivity and Storage at Key January Conferences. ...
-
WorldWide Tech & Science. Francisco De Jes�s. South Korea: LG takes on the iPhone 5 on newspaper ad. A newspaper advertisement b...
-
A bread board is also known as a project board, It has got itself a place in every electronics hobbyist because of its "User Friendly...
-
WorldWide Tech & Science. Francisco De Jes�s. CES2013: Download the app for your mobile. USA and Canada only. You can download th...
-
Switzerland's telecom service provider Swisscom is currently testing the LTE in Grenchen. According to the company statement, LTE is t...
-
WorldWide Tech & Science. Francisco De Jes�s. GMail v2.0 for iPhone and iPad is out. Description Get the official Gmail app for your iPh...
-
WorldWide Tech & Science. Francisco De Jesùs. Ecuador to launch its first satellite "Pegasus". Students desks will become spa...
Blog Archive
-
▼
2011
(66)
-
▼
January
(30)
- DTMF (Dual-tone multi-frequency )
- ELECTRONIC SOFTWARES & BOOKS FREE DOWNLOAD
- DIODES
- SWITCHES
- BREAD BOARD
- LIGHT DEPENDENT RESISTORS(LDR)
- LIGHT SENSITIVE ALARM
- LED TORCH USING MAX660
- SIMPLE LIE DETECTOR
- SIMPLE FM RECEIVER WITH EAR PHONES
- MOBILE PHONE CHARGER
- WIRELESS SWITCH
- LASER ACTIVATED SWITCH
- RADIO WAVES DETECTOR
- FREE PCB DESIGN SOFTWARE
- MISCELLANEOUS ELECTRONICS SOFTWARE
- FM TRANSMITTERS (SIMPLE DESIGNS)
- TRANSFORMERS
- TOUCH SWITCH
- SIMPLEST RADIO
- AIR CRAFT RADIO COMMUNICATION RECEIVER
- K- MAPS SOFTWARE AND INTRODUCTION(karnaughs maps)
- SR-FLIP FLOP
- NETWORK THEOREMS
- UNI JUNCTION TRANSISTOR
- BIPOLAR JUNCTION TRANSISTOR (BJT)
- FIELD EFFECT TRANSISTOR (FET)
- SILICON CONTROLLED RECTIFIER (SCR)
- JFET
- MOSFET
-
▼
January
(30)
About Us
Hi world! I'm an enthusiast blogger within passion in electronics field.
Footer Widget 2
Footer Widget 3
Copyright © 2011 what is electronics | Powered by Blogger
Design by Free WordPress Themes | Bloggerized by Lasantha - Premium Blogger Themes | Eagle Belt Buckles


0 comments:
Post a Comment